
Crawl Space Insulation: Floor Joists vs. Foundation Walls
Crawl space insulation belongs at the boundary of the home’s temperature-controlled enclosure. For a crawl that stays outside that enclosure, the floor above is commonly insulated. For a properly designed closed crawl brought inside the enclosure, insulation typically moves to the foundation walls. Choose the complete moisture and enclosure plan before choosing batts, boards or spray foam.
Last reviewed: October 6, 2026
Encapsulation alone does not tell you where insulation belongs. A ground liner, sealed vents and conditioned space are different features. Ask the contractor to show which side of the proposed insulation will be inside the home’s temperature-controlled enclosure.
In this guide: Crawl space insulation: floor or walls? · Wet or sagging fiberglass: a decision sequence · What a crawl space insulation quote should include · Frequently asked questions
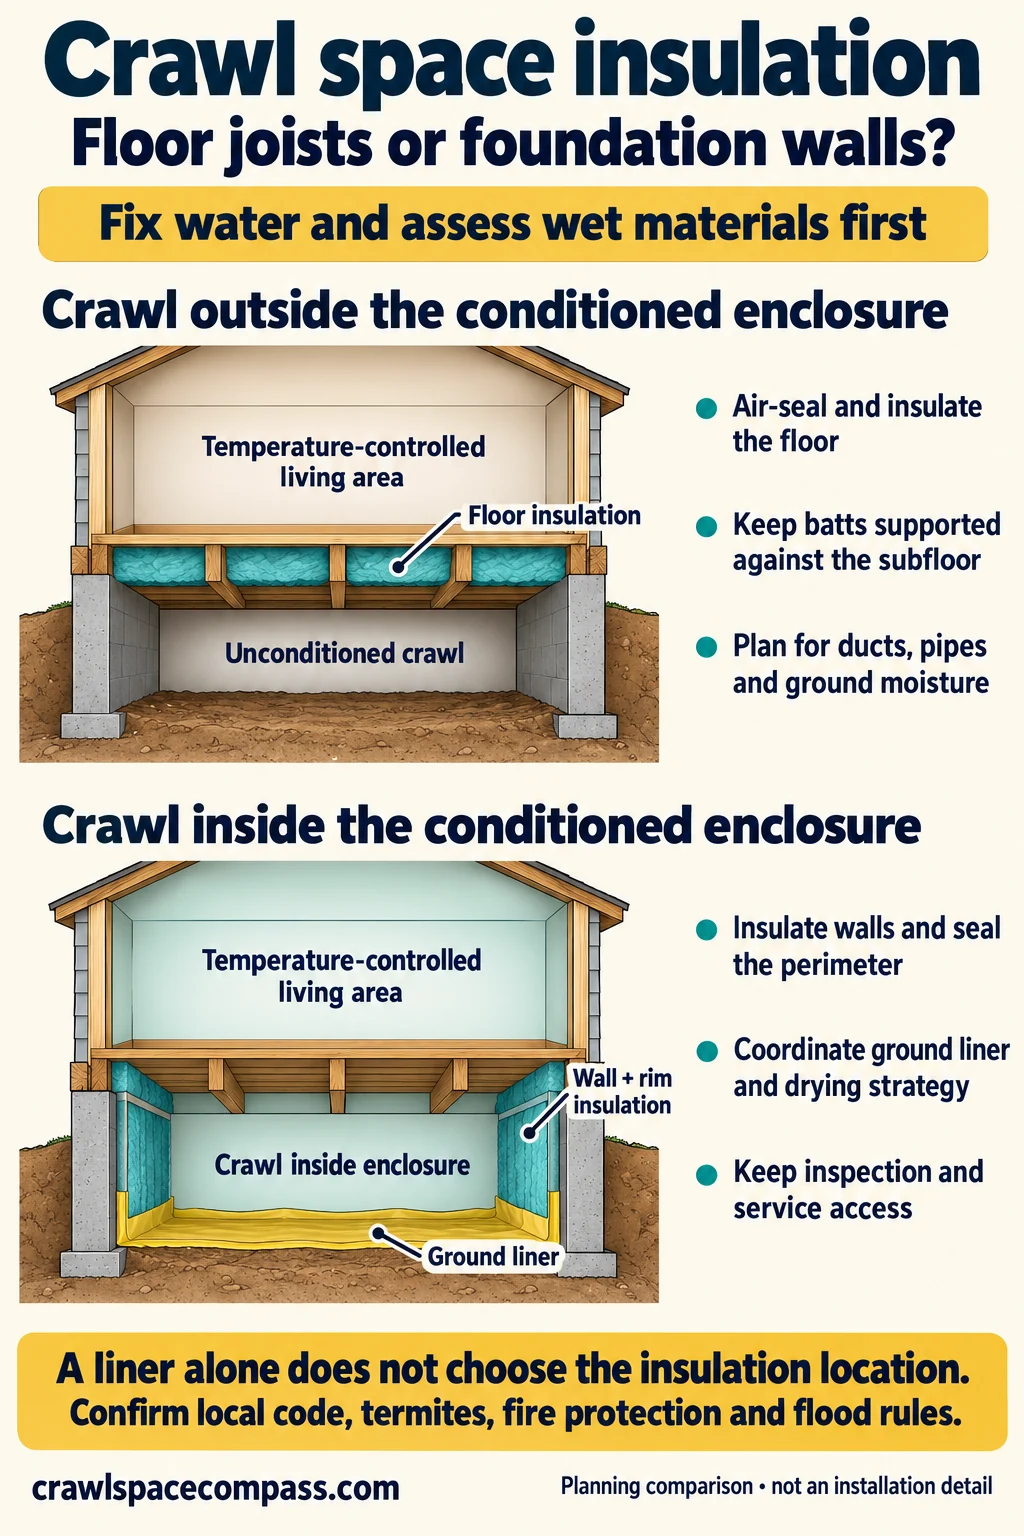
Read the insulation comparison as text
Fix water problems and assess wet materials before insulation work.
- Crawl outside the conditioned enclosure: air-seal and insulate the floor above. For batts, keep insulation supported against the subfloor without gaps or compression. Plan separately for ducts, pipes and ground moisture.
- Crawl inside the conditioned enclosure: insulate foundation walls and coordinate perimeter air sealing with the ground liner and an appropriate drying strategy. Assess rim-joist conditions and preserve inspection and service access. The illustration shows one wall-insulated design, not a direction to remove existing floor insulation.
A liner alone does not choose the insulation location. Confirm local code, termite inspection, fire protection and flood requirements. Use the comparison for planning, not as an installation detail.
Crawl space insulation: floor or walls?
| Existing or planned condition | Typical approach | What must be checked |
|---|---|---|
| Vented or otherwise unconditioned crawl space | Air-seal and insulate the floor above | Subfloor air barrier, insulation fit and support, ground moisture and exposed services |
| Closed crawl included in the conditioned enclosure | Insulate foundation walls with coordinated perimeter air sealing | Ground vapor control, drying strategy, rim details, access door, pest and fire requirements |
| Liner installed, but vents and enclosure strategy unclear | Confirm the design before adding or removing insulation | Whether the crawl is truly inside or outside the thermal boundary |
| Standing water, damp framing or wet insulation | Diagnose and correct moisture before the insulation finish work | Leaks, runoff, condensation, contamination and material condition |
DOE’s floor-insulation guidance addresses floors separating living space from an unconditioned crawl. Its conditioned crawl-wall job aid addresses the wall approach. Neither is a reason to change your existing ventilation system without evaluating the whole assembly. See crawl-space vents: open or closed for that broader decision.
First, make the crawl ready for insulation
Check roof runoff, plumbing, equipment condensate, standing water and ground vapor. Have unsafe wiring, damaged supports or suspected hazardous materials evaluated before work. If fuel-burning equipment draws combustion air from the crawl, a qualified contractor must assess combustion safety before air sealing changes that air supply. PNNL’s pre-retrofit assessment identifies these important screening issues.
Ask for moisture observations and photographs before anything is concealed. The drying decision should consider wood condition and measurements, the product’s installation limits and whether the moisture source is controlled. A dry-looking ground liner is not proof that framing above it is dry.
PNNL’s water-management guidance places moisture correction before a sealed, insulated retrofit and calls for monitoring afterward. Use our crawl-space inspection checklist to organize the findings.
Option 1: insulation between floor joists
Where the floor is the thermal boundary, first seal the appropriate openings through the subfloor, including plumbing, wiring and duct penetrations. The insulation needs to align with that air barrier rather than hang below an open air gap.
For batt installations, DOE emphasizes continuous contact with the subfloor and a fit without gaps, compression or voids. Durable supports keep the material in position. Ask how the installer will fit insulation around obstructions instead of simply draping it underneath pipes and wiring.
Floor insulation does not place the whole crawl inside the conditioned enclosure. Ask separately about duct condition, pipe protection and access for repairs. Do not assume more insulation at the floor will correct a humid crawl. The ground and moisture strategy still need attention.
Option 2: insulation on foundation walls
In a suitable closed-crawl design, wall insulation works with perimeter air sealing, a continuous ground vapor retarder and an approved moisture-control strategy. The PNNL guide to unvented, insulated crawl spaces discusses wall insulation together with access-door sealing, inspection provisions and local code review.
The wall-to-ground-liner transition, corners, access opening and rim or band joist need explicit details. The rim is the framing around the edge of the floor system. Have its moisture and drying potential assessed before covering it with foam.
Wall insulation needs durable attachment and compatible seam and edge seals, as described in DOE’s job aid. Ask for a drawing showing where the air barrier continues and where required inspection areas remain visible. Where a crawl-space dehumidifier is part of the design, specify its drainage, service access and operating plan. A dehumidifier alone does not establish compliance with every closed-crawl requirement.
If the property has required flood openings, do not cover or disable them as an insulation shortcut. PNNL specifically flags flood requirements as part of local review. Coordinate the assembly with the floodplain and building authorities where applicable.
Wet or sagging fiberglass: a decision sequence
- Identify why it is wet or displaced. Ask about leaks, condensation, humid air, ground moisture and failed supports. Record the affected area before removal.
- Assess contamination and damage. Floodwater, sewage, visible mold or damaged framing changes the cleanup scope. Avoid disturbing suspect material until an appropriate professional has assessed it.
- Decide whether material is salvageable. EPA explains that moldy porous materials may need disposal. Its remediation guidance lists replacement for water-damaged fiberglass insulation in its clean-water response table. Do not assume a wet batt is reusable because its surface later feels dry.
- Confirm the future insulation location. Replacing every removed batt makes little sense before deciding whether the floor or walls will be the final boundary.
- Verify drying and install the approved assembly. Ask for photographs and the installer’s documented criteria for proceeding.
Dry, uncontaminated insulation that has merely lost support presents a different decision from water-damaged material. Have its condition and suitability assessed; replacement should follow the findings rather than a blanket sales rule.
Materials, termites and fire protection
Batts, rigid boards and spray foam can serve different assemblies. Compare the named product, installed thickness, fastening, vapor characteristics and approved exposure conditions. “Foam” is not a complete specification, and a higher advertised R-value does not excuse missing air seals or wet substrates.
Termite inspectability must survive the upgrade. PNNL’s termite-resistant foundation guidance discusses inspection access and the way insulation can affect it. Ask the local building official and pest-control provider which inspection gaps, clearances or restrictions apply to the proposed materials and location. Do not turn a gap dimension from a national example into a universal local rule.
Foam plastics may require an ignition barrier, thermal barrier or a specifically approved exposed installation. The applicable assembly, product approval and local code determine the detail. DOE Standard Work Specifications for closed-crawl air sealing require applicable fire protection. Ask for the actual product documentation and finish detail rather than accepting “fire rated” as the whole explanation.
What a crawl space insulation quote should include
- The existing crawl condition and intended thermal boundary.
- Water-source repairs, drying, cleanup and any removal or disposal scope.
- Named insulation products, coverage areas, thicknesses and specified R-values.
- The air-sealing locations and the ground-vapor-control details.
- Support or attachment methods and treatment of corners, penetrations and access doors.
- Termite inspection access, required fire protection and any flood-opening restrictions.
- Who verifies permits, current code requirements and any combustion-safety work.
- A completion inspection, photos and the plan for moisture monitoring and service.
At handover, ask to see the work before inaccessible areas are closed. Look for documented continuity, secure materials, repaired liner damage, accessible equipment and the promised inspection areas. Keep product labels and installation records. Our quote-comparison guide helps turn those details into a consistent comparison.
Ask the contractor to trace the boundary
Before comparing prices, ask for an annotated photo or simple drawing of the proposed insulation and air-sealing path. Have the contractor mark the floor or walls, the rim area, the access opening and transitions to any adjacent unconditioned space. The drawing should explain how the parts connect and where inspection access stays visible.
Copy these prompts into your project notes:
- Final enclosure: Will the crawl stay outside or become part of the conditioned enclosure? What happens to the vents?
- Existing materials: What stays, what is removed, and what findings support that choice?
- Moisture readiness: Which water sources are addressed, what framing measurements are recorded, and who decides the assembly is ready to cover?
- Insulation and air sealing: Which products, coverage areas, supports, seals and transition details are included?
- Local review: Who confirms permits, energy-code requirements, termite access, fire protection, combustion safety and any flood restrictions?
- Completion evidence: Who provides product records, before-and-after photos, inspection results and the ongoing moisture-check plan?
Example: one proposal says “replace fallen batts,” while another says “insulate the walls and close the crawl.” Those bids describe different enclosure plans. Ask each contractor to explain the intended boundary, existing-insulation decision and moisture scope before treating the prices as comparable. Use the crawl-space permit-check workflow to document the local office’s answer for the actual work.
If ducts are sweating, include a separate HVAC assessment rather than assuming the insulation change will cure it. The duct-condensation guide explains what observations help. After the work, keep checking conditions through changing weather using the humidity monitoring guide.
Frequently asked questions
Should old floor insulation come out during encapsulation?
It depends on its condition and the approved final design. Ask the proposal to explain whether it remains useful, obstructs inspection or needs removal because of damage or contamination. Encapsulation does not automatically settle the question.
Should both the floor and foundation walls be insulated?
More insulated surfaces do not automatically make a better system. In PNNL’s illustrated wall-insulated, unvented design, floor insulation is unnecessary because the crawl is inside the enclosure. Have the designer explain the purpose of each layer in your home before adding or removing material. Existing insulation condition, moisture behavior and local requirements still matter.
What R-value does my crawl space need?
Confirm the currently adopted local energy code, climate zone, assembly and project requirements. There is no single R-value appropriate to every crawl space. Ask the installer to document the basis for the specified value.
Can insulation touch the ground?
Only use a material and assembly approved for that exposure. Floor batts lying on soil are not performing their intended job. Ground-contact, moisture and termite details need product-specific and local review.
Will insulation guarantee lower bills or stop mold?
No specific saving or mold-free outcome can be promised from insulation alone. Installation quality, air leakage, moisture sources, HVAC operation and the rest of the home affect results.
Sources and review approach
Reviewed October 6, 2026. This guide draws on the linked DOE installer and building-science guidance, DOE-funded PNNL references, Standard Work Specifications and EPA moisture/remediation guidance. The comparison graphic, project-note prompts and acceptance questions are Crawl Space Compass editorial tools. The conceptual graphic was created for this guide; it is not a product specification or an installation drawing. National examples support planning; current local requirements and the inspected assembly govern the work.
- DOE: Insulating Floors over Unconditioned Space
- DOE: Insulate Conditioned Crawl Space Wall
- PNNL: Unvented, Insulated Crawlspaces
- PNNL: Pre-Retrofit Assessment of Crawlspaces and Basements
- PNNL: Water Management of Existing Crawlspace Floor
- PNNL: Termite-Resistant Foundations and Walls
- DOE Standard Work Specifications: Closed Crawlspace Air Sealing
- EPA: A Brief Guide to Mold, Moisture and Your Home
- EPA: Water Damage Cleanup and Mold Prevention, Table 1